 by
by The Decorator design pattern allows behavior addition to an object either statically or dynamically without affecting the core behavior of other objects from the same class. This design pattern allows us to change the behavior of any specific object which is achieved by a wrapper class to the original class known as Decorator class. The original class is divided into two parts, one is with the essential basic features of the original class while the other one is the decorator base class which implements the same interface as the original class but allows to create several concrete decorator class having their own additional methods. For Design patterns basic explanation see (Design Patterns Simplified Version)
Generic model class diagram of Decorator design pattern is as shown in image.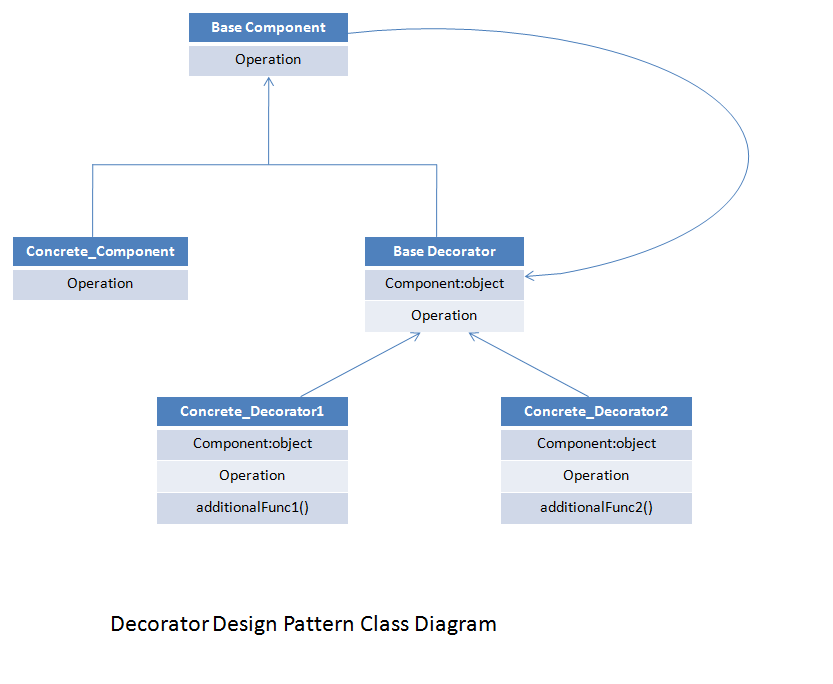
This design pattern allows us to design these sub-classes in such manner that these decorators classes can be stacked on top of each other adding a new functionality every time to the final object, hence providing the new behavior to selective objects at run time.
Decorator Design Pattern Code Example:
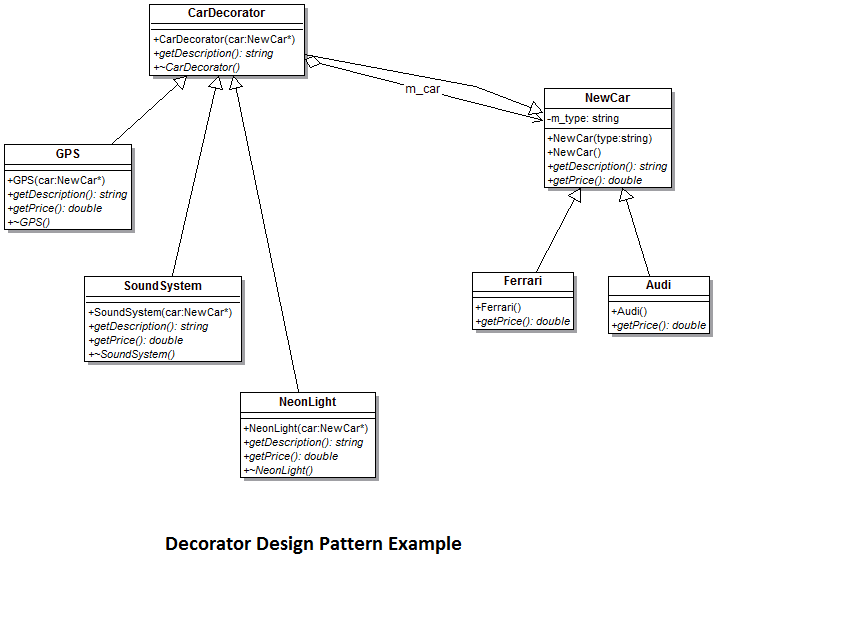
Let’s take a very basic example of buying a car, in which people are allowed to choose from random types of gadgets provided by the vendor along with basic cost of the car in which they can add any gadgets by paying some extra amount of money. Class diagram for the solution of this problem is as shown in image.
Let’s have a look on the “NewCar” abstract base class which will act as a component class.
/* Abstract Base class works as component class */
class NewCar
{
public:
	NewCar(string type): m_type(type)
	{}
	NewCar()
	{}
	virtual string getDescription()
	{
		return m_type;
	}
	virtual double getPrice() = 0;
private:
	string m_type;
};
Let’s have a look on the concrete component classes which inherits the abstract base class.
/* Concrete Base Component class */
class Ferrari: public NewCar
{
public:
	Ferrari(): NewCar("Ferrari")
	{}
	virtual double getPrice()
	{
		return 40000;
	}
};

/* Concrete Base Component class */
class Audi: public NewCar
{
public:
	Audi(): NewCar("Audi")
	{}
	virtual double getPrice()
	{
		return 30000;
	}
};
Now, Let’s have a look on the Base and Concrete Decorator classes which will allow us to add new gadgets in the car.
/* Abstract Decorator Base Class */
class CarDecorator: public NewCar
{
protected:
	NewCar* m_car;
public:
	CarDecorator(NewCar* car)
	{
		m_car = car;
	}
	virtual string getDescription() = 0;
	virtual ~CarDecorator()
	{
		cout<<"~CarDecorator"<<endl;
		delete m_car;
	}
};

/* Concrete Decorator Class */
class GPS: public CarDecorator
{
public:
	GPS(NewCar* car): CarDecorator(car) {}
	virtual string getDescription()
	{
		return (m_car->getDescription() + " , GPS ");
	}
	virtual double getPrice()
	{
		return (m_car->getPrice() + 432);
	}
	virtual ~GPS(){}
};

class SoundSystem: public CarDecorator
{
public:
	SoundSystem(NewCar* car): CarDecorator(car)
	{}
	virtual string getDescription()
	{
		return (m_car->getDescription() + " , Sound System ");
	}
	virtual double getPrice()
	{
		return (m_car->getPrice() + 210);
	}
	virtual ~SoundSystem(){}
};

class NeonLight: public CarDecorator
{
public:
	NeonLight(NewCar* car): CarDecorator(car)
	{}
	virtual string getDescription()
	{
		return (m_car->getDescription() + " , Neon Light ");
	}
	virtual double getPrice()
	{
		return (m_car->getPrice() + 950);
	}
	virtual ~NeonLight(){}
};
Let’s see now how to use the above described classes to build the final product. Below code is sample “main” function code.
int main()
{
	NewCar* ferrari = new Ferrari();
	NewCar* audi    = new Audi();

	cout<<"Base Model of "<<ferrari->getDescription()<<" with price: "<<ferrari->getPrice()<<" Selected"<<endl;
	cout<<"Base Model of "<<audi->getDescription()<<" with price: "<<audi->getPrice()<<" Selected"<<endl;

	NewCar* neonLightFerrari = new NeonLight(ferrari);
	cout<<"Base Model of "<<neonLightFerrari->getDescription()<<" with price: "<<neonLightFerrari->getPrice()<<" Selected"<<endl;
	NewCar* gpsFerrari = new GPS(new NeonLight(ferrari));
	cout<<"Base Model of "<<gpsFerrari->getDescription()<<" with price: "<<gpsFerrari->getPrice()<<" Selected"<<endl;
	NewCar* soundSystemFerrari = new SoundSystem(new GPS(new NeonLight(ferrari)));
	cout<<"Base Model of "<<soundSystemFerrari->getDescription()<<" with price: "<<soundSystemFerrari->getPrice()<<" Selected"<<endl;

	NewCar* neonLightAudi = new NeonLight(audi);
	cout<<"Base Model of "<<neonLightAudi->getDescription()<<" with price: "<<neonLightAudi->getPrice()<<" Selected"<<endl;

	delete ferrari, audi, gpsFerrari, soundSystemFerrari, neonLightFerrari, neonLightAudi;
}
Output of the above given example:
Base Model of Ferrari with price: 40000 Selected
Base Model of Audi with price: 30000 Selected
Base Model of Ferrari , Neon Light  with price: 40950 Selected
Base Model of Ferrari , Neon Light  , GPS  with price: 41382 Selected
Base Model of Ferrari , Neon Light  , GPS  , Sound System  with price: 41592 Selected
Base Model of Audi , Neon Light  with price: 30950 Selected