 by
by The Command design pattern allows to encapsulate an action or trigger inside an object which will be used later to trigger an event. Since in this design pattern, commands are encapsulated inside objects, hence we can use additional actions on this commands for example- Queuing of various commands, undo/redo actions etc. This design pattern is very useful in case of GUI actions (button, menu actions etc), transactional behaviour, progress bars etc. For Design patterns basic explanation see (Design Patterns Simplified Version).
Generic model class diagram of Command design pattern is as shown in image.
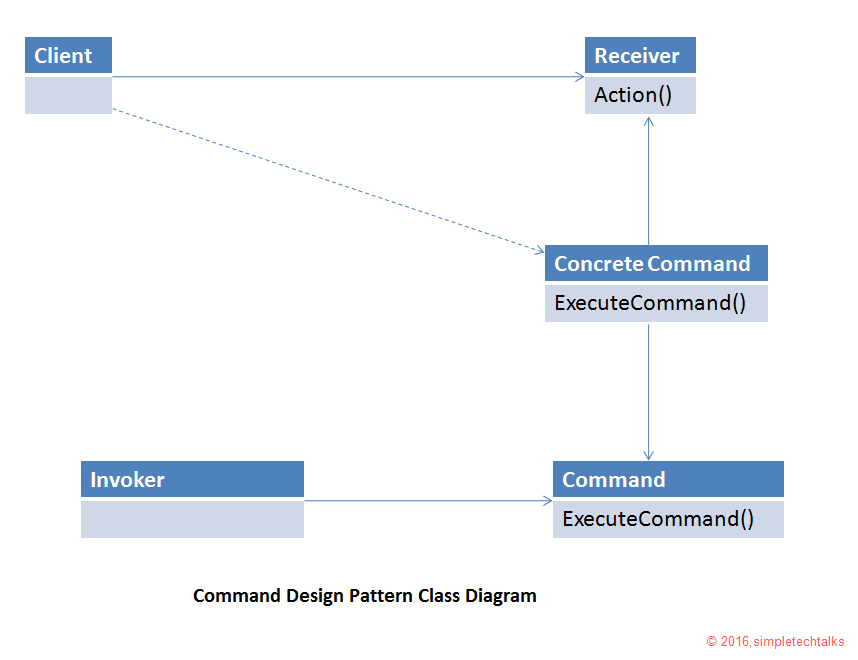
This design pattern has following major components:
1) Command – This is an object which encapsulates all the necessary information and also knows about the receiver and its method which needs to be called.
2) Receiver – The receiver provides various methods which is used by the command to perform specialized task. It also contains an invoker object which actually performs the task.
3) Invoker – This object has all the information to execute a command and it also does the record of commands which can be used to do back trace if needed.
4) Client – It contains all the command objects and invoker objects by help of which, it executes the command at the required point.
Command Design Pattern Code Example:
Let’s take an example of a radio which supports multiple commands such as: power on/off, channel up/down etc. User will provide multiple command to operate this radio. Class Diagram for this problem will be as shown in image.
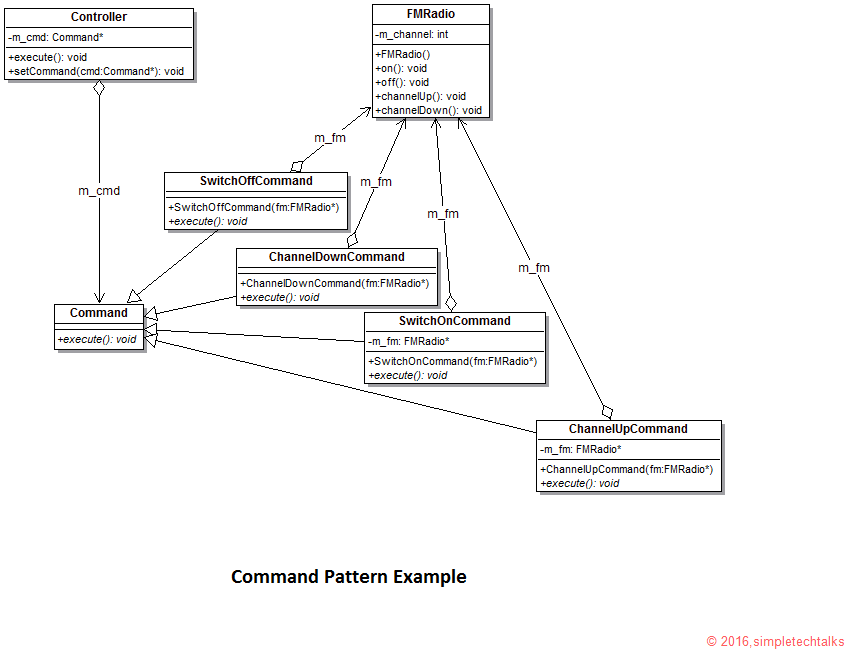
Let’s have a look on the Abstract Command class which will be inherited by all Concrete Command which are applicable on our final receiver class Radio.
/* Abstract Command Class */
class Command
{
public:
	virtual void execute() = 0;
};
Now, Let’s have a look on the receiver class “Radio” which will implement actions method which will be called from various commands.
/* Receiver Class */
class FMRadio
{
private:
	int m_channel;
public:
	FMRadio(): m_channel(1){}
	void on()
	{
		cout<<"FM Radio is switched on"<<endl;
	}
	void off()
	{
		cout<<"FM Radio is switched off"<<endl;
        }
        void channelUp()
        {
                m_channel++;
                if(m_channel > 10)
			m_channel = 1;
		cout<<"FM Radio channel is moved up to "<<m_channel<<endl;
	}
	void channelDown()
	{
		m_channel--;
		if(m_channel == 0)
			m_channel = 10;
		cout<<"FM Radio channel is moved down to "<<m_channel<<endl;
	}
};
Now, Lets have a look onto various concrete commands which will be sent by the user towards the receiver object “FMRadio”
/* Concrete Command */
class SwitchOnCommand: public Command
{
private:
	FMRadio* m_fm;
public:
	SwitchOnCommand(FMRadio* fm): m_fm(fm){}
	virtual void execute()
	{
		m_fm->on();
	}
};

/* Concrete Command */
class SwitchOffCommand: public Command
{
private:
	FMRadio* m_fm;
public:
	SwitchOffCommand(FMRadio* fm): m_fm(fm){}
	virtual void execute()
	{
		m_fm->off();
	}
};

/* Concrete Command */
class ChannelUpCommand: public Command
{
private:
	FMRadio* m_fm;
public:
	ChannelUpCommand(FMRadio* fm): m_fm(fm){}
	virtual void execute()
	{
		m_fm->channelUp();
	}
};

/* Concrete Command */
class ChannelDownCommand: public Command
{
private:
	FMRadio* m_fm;
public:
	ChannelDownCommand(FMRadio* fm): m_fm(fm){}
	virtual void execute()
	{
		m_fm->channelDown();
	}
};
Let’s look into the Invoker class now which will invoke the received commands on the receiver class.
/* Invoker Class */
class Controller
{
private:
	Command* m_cmd;
public:
	void execute()
	{
		m_cmd->execute();
	}
	void setCommand(Command* cmd)
	{
		m_cmd = cmd;
	}
};
Finally let’s look into the client code which will actually generate random commands towards the receiver class “FMRadio”. Below code is sample “main” function code.
int main ()
{
	FMRadio fm;
	SwitchOnCommand s_on(&fm);
	SwitchOffCommand s_off(&fm);
	ChannelUpCommand c_up(&fm);
	ChannelDownCommand c_down(&fm);
	Controller ctrl;

	ctrl.setCommand(&s_on);
	ctrl.execute();
	ctrl.setCommand(&c_up);
	ctrl.execute();
	ctrl.execute();
	ctrl.execute();
	ctrl.setCommand(&c_down);
	ctrl.execute();
	ctrl.execute();
	ctrl.setCommand(&s_off);
	ctrl.execute();
}
Output of the above given example:
FM Radio is switched on
FM Radio channel is moved up to 2
FM Radio channel is moved up to 3
FM Radio channel is moved up to 4
FM Radio channel is moved down to 3
FM Radio channel is moved down to 2
FM Radio is switched off