 by
by The Bridge design pattern is used to separate out interface details and implementation details to reduce the dependency on each other which will provide the flexibility of changing one part without affecting the other part. This design pattern is useful in cases where the class and its function both changes frequently. For Design patterns basic explanation see (Design Patterns Simplified Version)
Generic model class diagram for Bridge design pattern can be explained as shown in image. 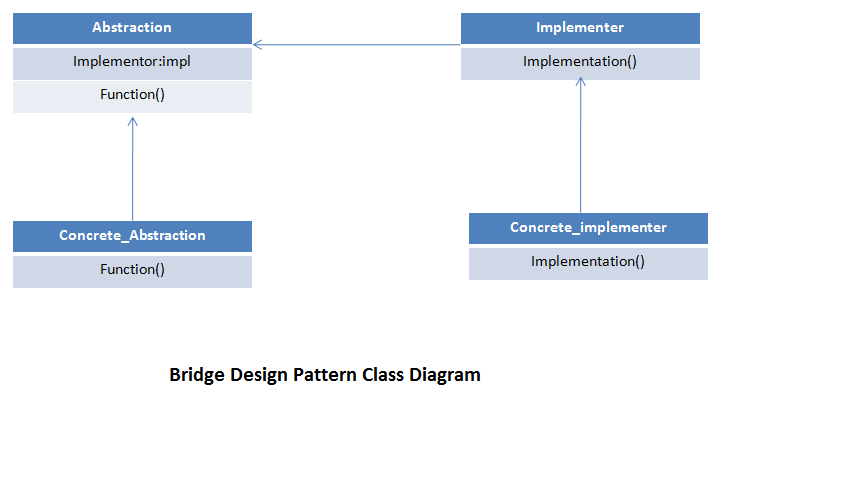
This design pattern has following major components:
1) Abstraction Class – This class defines the abstract interface and it contains object of implementor class.
2) ConcreteAbstraction – This class has the implementation details of the abstraction class interfaces.
3) Implemetor – This class defines the abstract interface for the concrete implementor classes.
4) ConcreteImplementor – This class has the implementation details of the Implementor class interfaces.
Bridge Design Pattern Code Example:
Let’s take a very basic example of appliances and their remote control via which we can turn on the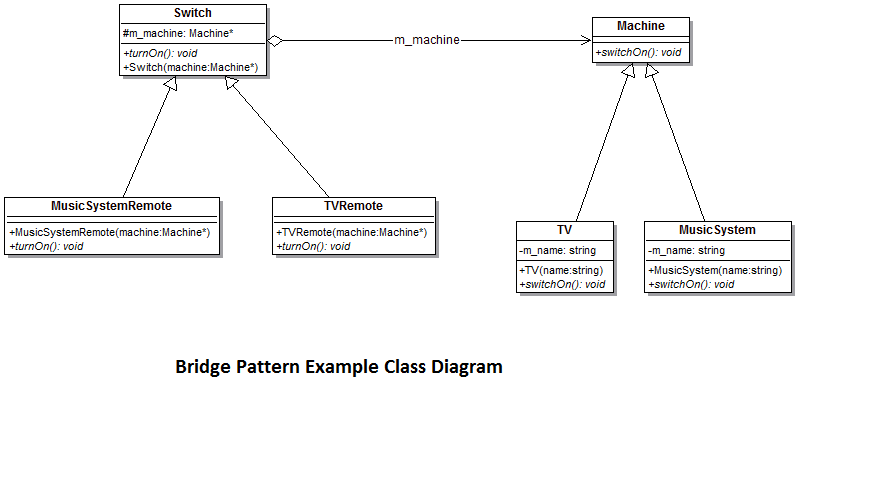 respective machine. Here in this example remote control classes will act as Abstraction class whereas appliances class will act as Implementor class. Class diagram for the solution of this problem is as shown in image.
Let’s have a look on Implementor and Concrete Implementor classes.
/* Abstract Implementor Class */
class Machine
{
public:
	virtual void switchOn()
	{
		cout<<"Machine Switched on"<<endl;
	}
};

/* Concrete Implementor Class */
class TV: public Machine
{
private:
	string m_name;
public:
	TV(string name): m_name(name) {}
	virtual void switchOn()
	{
		cout<<"TV "<<m_name<<" Switched on"<<endl;
	}
};

/* Concrete Implementor Class */
class MusicSystem: public Machine
{
private:
	string m_name;
public:
	MusicSystem(string name): m_name(name) {}
	virtual void switchOn()
	{
		cout<<m_name<<" Music System Switched on"<<endl;
	}
};
Let’s have a look on the abstraction class and concrete abstraction classes.
/* Abstraction Class */
class Switch
{
protected:
	Machine* m_machine;
public:
	virtual void turnOn() = 0;
	Switch(Machine* machine):m_machine(machine) {};
};

/* Concrete Abstraction Class */
class TVRemote: public Switch
{
public:
	TVRemote(Machine* machine): Switch(machine) {};
	virtual void turnOn()
	{
		cout<<"TV Remote turned on "<<endl; m_machine->switchOn();
	}
};

/* Concrete Abstraction Class */
class MusicSystemRemote: public Switch
{
public:
	MusicSystemRemote(Machine* machine): Switch(machine) {};
	virtual void turnOn()
	{
		cout<<"Music System Remote turned on "<<endl; m_machine->switchOn();
	}
};
Let’s see now how to use the above described classes to build the final product. Below code is sample “main” function code.
int main()
{
	Machine* m1 = new TV("LG SMART TV");
	Machine* m2 = new MusicSystem("Sony");

	Switch* s1 = new TVRemote(m1);
	Switch* s2 = new MusicSystemRemote(m2);

	s1->turnOn();
	s2->turnOn();

	delete m1;
	delete m2;
	delete s1,s2;
}
Output of the above given example:
TV Remote turned on
TV LG SMART TV Switched on
Music System Remote turned on
Sony Music System Switched on