 by
by The Prototype design pattern is used when the objects which needs to be created is of similar types and can be cloned to produce new objects. The main aim of this pattern is to minimize the required cost of creating new object. This design pattern declares an abstract base class which exposes pure virtual clone() member function which is called by the client to get the required object instead of calling “new”. The idea behind this design pattern is to create first object of all prototype classes by the usual method and then for other objects use clone method which will create the new objects by copying the prototype objects. For Design patterns basic explanation see (Design Patterns Simplified Version)
Generic model class diagram for Prototype Design pattern can be explained as shown in the image.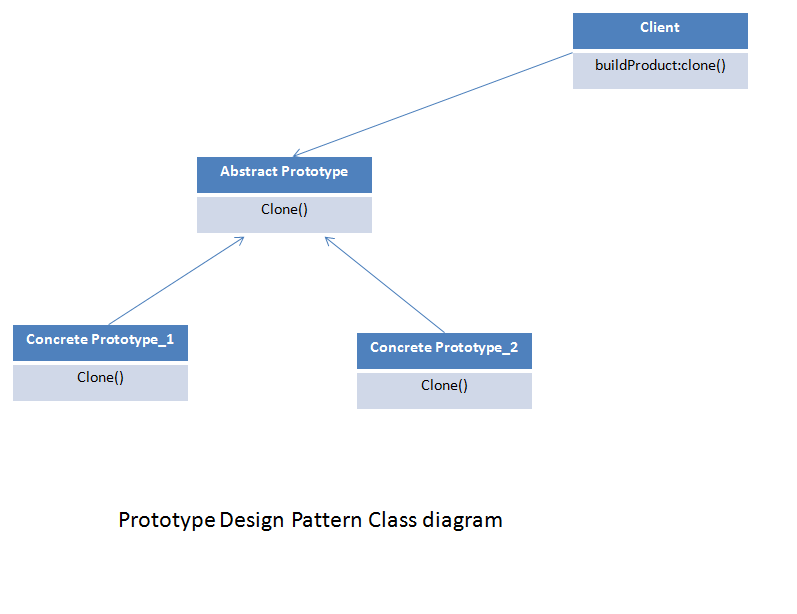
This design pattern has following major components:
1) Abstract Prototype – This class declares the interfaces and it also exposes the clone method which returns the concrete prototype class object.
2) Concrete Prototype – This class is the actual prototype class which implements all the interfaces and clone method exposed by the Abstract Prototype class.
3) Client – This class uses the interfaces declared by Abstract Prototype classes and creates final objects.
Prototype Design Pattern Code Example: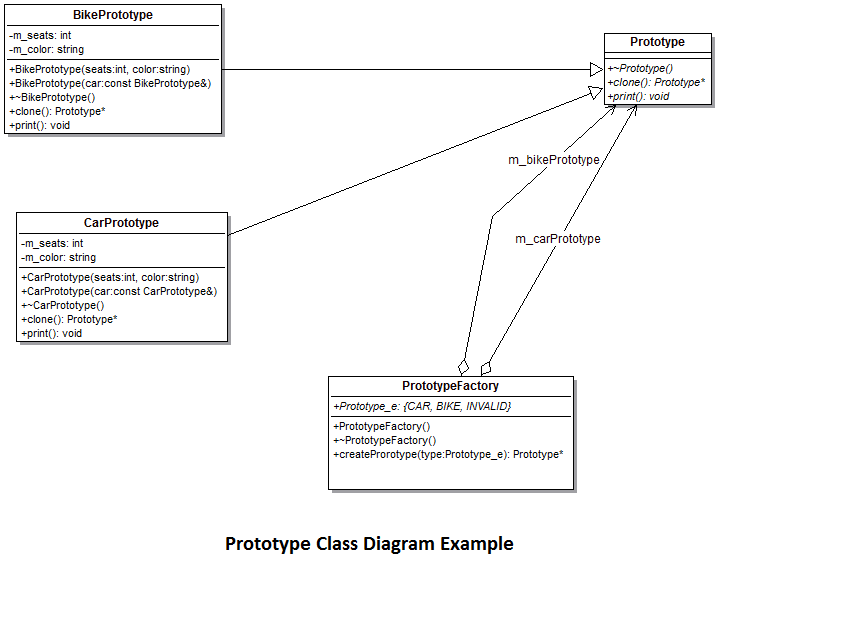
Let’s take an example of automobile industry use case in which we have to create an object for each bike and car. Technically each bike and car has the same prototype. Class diagram for the solution of this problem is as shown in image.
Let’s have a look on below classes which will act as abstract and concrete prototype classes.
/* Abstract Base class */
class Prototype
{
public:
	virtual ~Prototype() {};
	virtual Prototype* clone() = 0;
	virtual void print() = 0;
};

/* Concrete Prototype Class  */
class CarPrototype:public Prototype
{
private:
	int m_seats;
	string m_color;
public:
	CarPrototype(int seats, string color): Prototype(), m_seats(seats), m_color(color)
	{}
	CarPrototype(const CarPrototype& car): Prototype() //Calling base copy constructor
	{
		m_seats = car.m_seats;
		m_color = car.m_color;
	}
	~CarPrototype() {};
	Prototype* clone()
	{
		return new CarPrototype(*this);
	}
	void print()
	{
		cout<<"Car prototype created with "<<m_seats<<" seats and "<<m_color<<" color"<<endl;
	}
};

/* Concrete Prototype Class  */
class BikePrototype:public Prototype
{
private:
	int m_seats;
	string m_color;
public:
	BikePrototype(int seats, string color): Prototype(), m_seats(seats), m_color(color)
	{}
	BikePrototype(const BikePrototype& car): Prototype() //Calling base copy constructor
	{
		m_seats = car.m_seats;
		m_color = car.m_color;
	}
	~BikePrototype() {};
	Prototype* clone()
	{
		return new BikePrototype(*this);
	}
	void print()
	{
		cout<<"Bike prototype created with "<<m_seats<<" seats and "<<m_color<<" color"<<endl;
	}
};
Now, Let’s have a look on Prototype Client class which maintains all the cloned objects of concrete prototype classes.
These class objects will be used in the main function to create objects of required prototype classes.
/* Client class that manages instances of protypes and handles clones*/
class PrototypeFactory
{
private:
	Prototype* m_bikePrototype;
	Prototype* m_carPrototype;
public:
	PrototypeFactory()
	{
		m_bikePrototype = new BikePrototype(2,"Black");
		m_carPrototype = new CarPrototype(4,"Red");
	}
	~PrototypeFactory()
	{
		delete m_bikePrototype;
		delete m_carPrototype;
	}
	enum Prototype_e {CAR,BIKE,INVALID};
	Prototype* createProrotype(Prototype_e type)
	{
		switch(type)
		{
		case CAR:
			return m_carPrototype->clone();
		case BIKE:
			return m_bikePrototype->clone();
		}
		return NULL;
	}
};
Let’s see now how to use the above described classes to build the final product. Below code is sample “main” function code.
int main()
{
	PrototypeFactory* factory = new PrototypeFactory();
	Prototype* type;

	type = factory->createProrotype(PrototypeFactory::Prototype_e::CAR);
	type->print();
	delete type;

	type = factory->createProrotype(PrototypeFactory::Prototype_e::BIKE);
	type->print();
	delete type;

	delete factory;
}
Output of the above given example:
Car prototype created with 4 seats and Red color
Bike prototype created with 2 seats and Black color