 by
by Builder design pattern is used to solve the problem where application contains complex objects which are made of similar kind of other objects. Sometimes to create a complex class objects increases the object constructor parameter combination which leads to large number of constructors. Instead of using several constructors, Builder pattern uses another object called “Builder” that receives all the initialization arguments and returns the final object. For Design patterns basic explanation see (Design Patterns Simplified Version)
Component
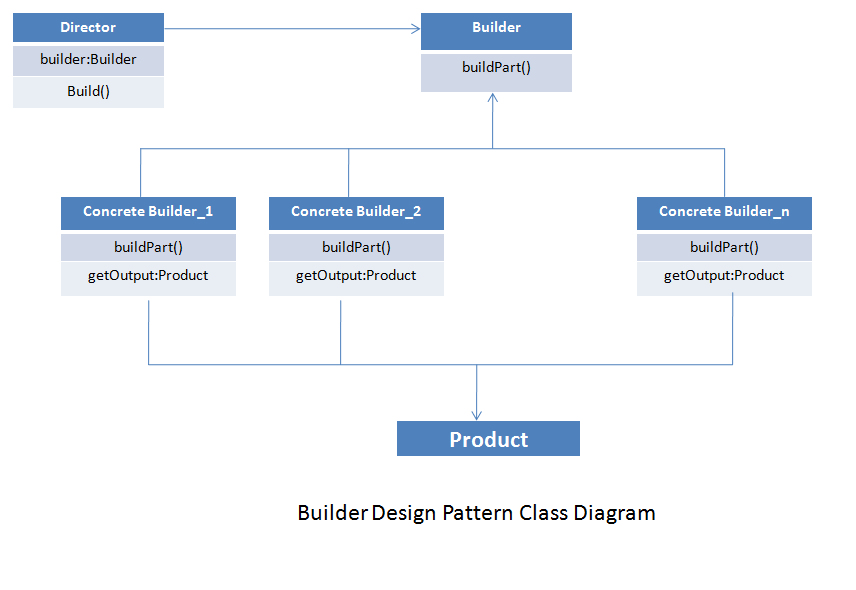
There are four major components in this pattern:
- Director: This class creates the product using the builder interface.
- Builder: This class provides the abstract interface to build the building blocks of a product.
- Concrete Classes: This class provides the implementation of Builder interface class.
- Product: This is the complex class whose object will be created at the end.
Generic model Class diagram for Build design pattern can be explained as mentioned in image.
Usage
Build Design Pattern can be used in following scenarios:
- When the final object which needs to be created is complex and have multiple variations.
- When the construction of this object can be done in multiple steps.
- Most Importantly, when the object creation process is independent of its components.
In above mentioned cases, Build design patterns is certainly a winner.
Builder Design Pattern Code Example:
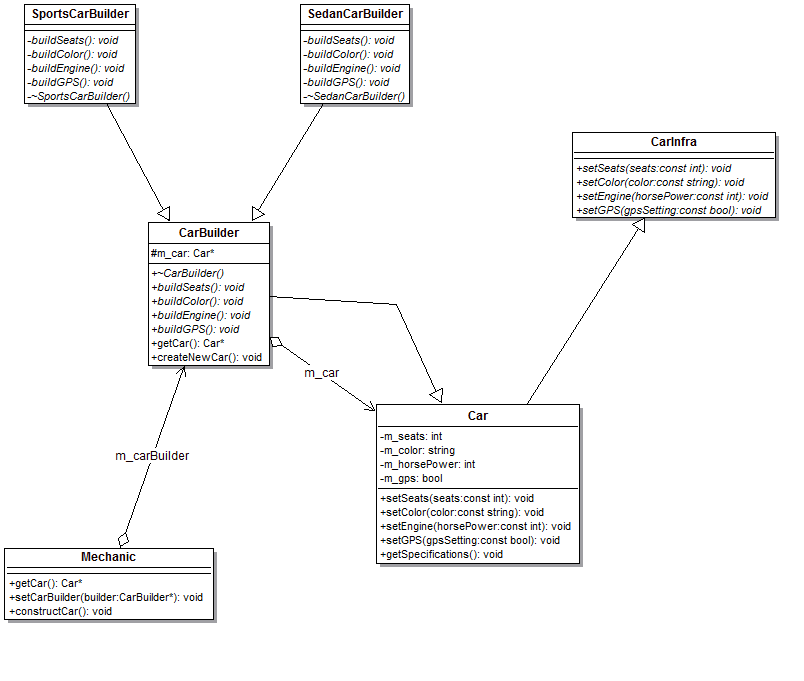
Here we are explaining this design pattern with very basic example. Let’s consider the problem statement which is for a Mechanic to create a Car. In this example “Car” is the product and “Mechanic” is the director. Class Diagram for this problem will be as shown in image.
Let’s have a look on below class which will act as Product which is in this case is “Car”.
/* Concrete class for carInfra interface */
class Car:public CarInfra
{
private:
	int m_seats;
	string m_color;
	int m_horsePower;
	bool m_gps;

public:
	void setSeats(const int seats)
	{
		m_seats = seats;
	}
	void setColor(const string color)
	{
		m_color = color;
	}
	void setEngine(const int horsePower)
	{
		m_horsePower = horsePower;
	}
	void setGPS (const bool gpsSetting)
	{
		m_gps = gpsSetting;
	}
	void getSpecifications()
	{
		cout <<  "Car created with " << m_seats << " seats " << m_horsePower << " horsepower engine with GPS settings "
			 << m_gps << " in " << m_color << " Color" << endl;
	}
};
Let’s have a look onto abstract Interface class which will provide the definition of all the methods which are needed to create the product which is in this case is “Car”.
/* Interface class which will be used to build the product */
class CarInfra
{
public:
	virtual void setSeats(const int seats) = 0;
	virtual void setColor(const string color) = 0;
	virtual void setEngine(const int horsePower) = 0;
	virtual void setGPS (const bool gpsSetting) = 0;
};
At this point we have our product class ready and method to initialize all the parameters of this product is identified. Now, Let’s see the Abstract builder class.
/*Abstract Builder Class for Car */
class CarBuilder:public Car
{
public:
	virtual ~CarBuilder() {};
	virtual void buildSeats() = 0;
	virtual void buildColor() = 0;
	virtual void buildEngine() = 0;
	virtual void buildGPS() = 0;
	Car* getCar()
	{
		return m_car;
	}
	void createNewCar()
	{
		m_car = new Car;
	}
protected:
	Car* m_car;
};
“SportsCarBuilder” and “SedanCarBuilder” are the two concrete classes which will inherit “CarBuilder” Interface. Sample code for these two concrete classes are as follows:
/* Concrete class to build sports car */
class SportsCarBuilder:public CarBuilder
{
private:
	virtual void buildSeats()
	{
		m_car->setSeats(2);
	}
	virtual void buildColor()
	{
		m_car->setColor("Red");
	}
	virtual void buildEngine()
	{
		m_car->setEngine(1000);
	}
	virtual void buildGPS()
	{
		m_car->setGPS(true);
	}
	virtual ~SportsCarBuilder()
	{
		delete m_car;
	}
};

/*Concrete Class to build sedan car */
class SedanCarBuilder:public CarBuilder
{
private:
	virtual void buildSeats()
	{
		m_car->setSeats(4);
	}
	virtual void buildColor()
	{
		m_car->setColor("Black");
	}
	virtual void buildEngine()
	{
		m_car->setEngine(500);
	}
	virtual void buildGPS()
	{
		m_car->setGPS(true);
	}
	virtual ~SedanCarBuilder()
	{
		delete m_car;
	}
};
Director class in this example will be “Mechanic” which will use these concrete classes to build the product via build interface. Let’s see the implementation of this director class.
/* Director class which constructs the Car */
class Mechanic
{
private:
	CarBuilder* m_carBuilder;

public:
	Car* getCar()
	{
		return m_carBuilder->getCar();
	}
	void setCarBuilder(CarBuilder* builder)
	{
		m_carBuilder = builder;
	}
	void constructCar()
	{
		m_carBuilder->createNewCar();
		m_carBuilder->buildColor();
		m_carBuilder->buildEngine();
		m_carBuilder->buildGPS();
		m_carBuilder->buildSeats();
	}
};
Let’s see now how to use above classes to build the final product. Below code is sample “main” function code.
int main()
{
	Mechanic mechanic;
	CarBuilder* sportsCarBuilder = new SportsCarBuilder();
	CarBuilder* sedanCarBuilder = new SedanCarBuilder();

	mechanic.setCarBuilder(sportsCarBuilder);
	mechanic.constructCar();

	Car* sportsCar = mechanic.getCar();
	sportsCar->getSpecifications();

	mechanic.setCarBuilder(sedanCarBuilder);
	mechanic.constructCar();

	Car* sedanCar = mechanic.getCar();
	sedanCar->getSpecifications();

	delete sportsCarBuilder;
	delete sedanCarBuilder;
}
Output of above given example:
Car created with 2 seats 1000 horsepower engine with GPS settings 1 in Red Color
Car created with 4 seats 500 horsepower engine with GPS settings 1 in Black Color